Mplab X IDE Tutorial For blinking an LED and Comparison with Mplab IDE

Mplab X IDE and XC8 C Compiler
Mplab X IDE is the latest avatar of Mplab IDE which is provided by microchip. It is launched with better features, interfaces and is quiet advanced IDE then the old version of Mplab which were introduced in the past.
In this tutorial we will see some basic and advanced features and benefits while coding with Mplab X over the traditional Mplab IDE. With a Sample source code at the end of this post I will also show a comparison of the output hex files generated with Mplab IDE and Mplab X IDE.
Now a days developer IDE for any programming language are Hi-end, like visual studio or Eclipse which provides better interface and features, but Microchips older versions of IDE never had these features of autocomplete and suggestions while writing the codes. Hence this new avatar as MPLAB X settles these problems and the way it looks.
The Mplab X IDE uses its platform as Netbeans from oracle, Hence while coding with it might make you feel as if you are working on Netbeans IDE, because lots of Mplab X features are taken from Netbeans.
Features of Mplab X IDE Over Mplab IDE

Before installing you might want to update java for the installation to run smooth. Since its java based IDE now, so Mplab X is not limited to windows.
As a long awaited feature, Mplab X IDE is now available on Linux and Mac OS versions also, which can be easily downloaded from microchip’s website for free. So the programmer does not have to be confined to a windows computer only, as it was the case with old versions of Mplab IDE. Apart from better looks and interface, one of the most amazing thing which can be noticed is the size of output after compilation (the hex file).
After coding and compiling the sample codes from my previous tutorials, I found that the compiled output hex files by XC8 were way smaller in size than that of the output from old Mplab IDE and C18 compiler. Hence compiling with Mplab X can save a lot of space.
In traditional Mplab IDE you had to be selective about the type of the compiler, for the family of microcontroller you are coding. For Example: To code a PIC18F family microcontroller you needed C18 Compiler and for PIC16F microcontroller it was required to install a different Compiler Toolsuite. Hence now microchip integrated most of its different compiler toolsuite into one XC8 compiler for Mplab x which support all 8, 16 and 32 bit microcontroller family. Hence all you need is just to download the Mplab X and XC8 Compiler.
The older version of Mplab projects can still be imported into the latest Mplab X without any difficulty with project wizard.
Note: I will try to attach an Mplab X version of project file for download with each of my old tutorials which were done on Mplab IDE. Lot of programmer who have the habit of programming with old versions of IDE sometimes find it little difficult to work with latest Mplab X versions, But it is really not so hard, once you get to know it more. In this tutorial we are going to use Mplab X IDE and XC8 Compiler to code our microcontroller.
PIC18F4550 Programming with MPLAB X IDE
Before we start coding on PIC18F4550 with mplab X , we need to create a new project just like Mplab IDE.
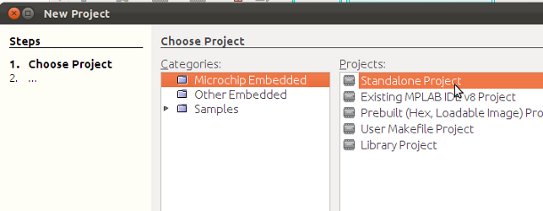
Creating a project is easy in Mplab X, just open the IDE and proceed to project wizard from file menu. Select the microcontroller family or directly type the name of the microcontroller in the device name.
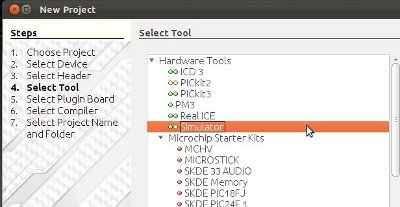
Then select the hardware tool from the list, if you have any programmer like pickit2 connected then select pickit2 or go with the defaults and click next.
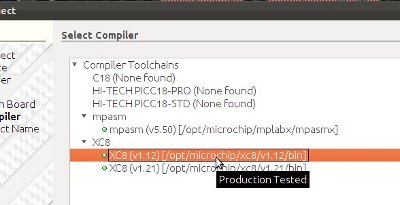
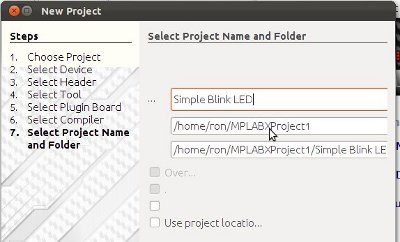
Select XC8 C compiler from the list of compiler which I assume you must have installed after installing Mplab X IDE and finally type a project name – and you are ready for coding.
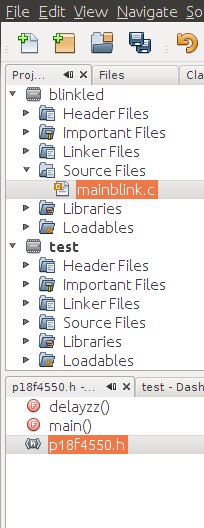
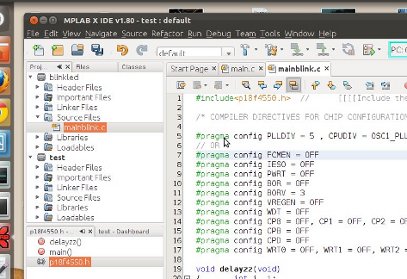
It will open a blank project, Now you can create a new source file from the project explorer by right clicking on Source File > New > C main File.
Select your desired Name, the extension must be C and then finally click finish. It will open a default source code template; you are ready for coding with Mplab X.

Blinking an LED with Mplab X IDE and PIC18F4550
For testing the Mplab X IDE we are going to use the same source code from one of my previous tutorial where we coded a pic18f4550 with Mplab ide for blinking an led. We are just going to replicate our previous tutorial with a different IDE.
-Create a New project and select device as "PIC18F4550" from drop down menu, and proceed with creating a new project with XC8 Compiler.
-Create a New Source C file. And clean it up.
-Copy the source code from previous post– Blinking an LED using pic18f4550.
-Run > Build project.
If everything goes right then the output windows below will display a Build Successful message. The output window at the bottom will also show the location of .hex files which were just created. If you have a pickit2 attached then you directly burn the firmware into the microcontroller or Navigate to the .hex file location which is usually,
MplabProjectFoler/Projectname.X/Dist/Default/Production Folder
Search for the file with .hex in the production folder. If you have a pickit already attached then you can program directly or you can use other programmers to burn the output .hex file in to pic18f4550 microcontroller. The source code above should blink RB-0 and RB-1 alternatively with a dealy inbetween the two LED. The schematics are same as shown in my previous post.
Comparison of HEX files compiled with
MPLAB X IDE and MPLAB IDE v8
Now as I have mentioned before that you will notice that the size of the .hex file be much more shorter when you compile with Mplab X then that of Mplab IDE. Hence here we are going to do a small practical Observation.
Project for blinking led with same source code, I first compiled it with traditional MPLAB IDE and the .hex file came out something like this for just blinking two led.
.HEX file compiled With Mplab IDE ( C18 )
:020000040000FA
:06000000A8EF00F0120061
:020006000000F8
:08000800060EF66E000EF76E05
:10001000000EF86E00010900F550656F0900F550FB
:10002000666F03E1656701D03DD00900F550606F50
:100030000900F550616F0900F550626F0900090071
:10004000F550E96E0900F550EA6E09000900090053
:10005000F550636F0900F550646F09000900F6CF91
:1000600067F0F7CF68F0F8CF69F060C0F6FF61C0C5
:10007000F7FF62C0F8FF0001635302E1645307E039
:100080000900F550EE6E6307F8E26407F9D767C020
:10009000F6FF68C0F7FF69C0F8FF00016507000EB2
:0600A000665BBFD71200F1
:0A00A600D9CFE6FFE1CFD9FF040E29
:1000B000E126DE6ADD6ADECF02F0DDCF03F0D89004
:1000C000035004E6880E025C130E03581DE2020E74
:1000D000DB6A030EDB6A020EDBCF02F0030EDBCF1E
:1000E00003F0D890035004E6020E025C000E0358A1
:1000F00006E2020EDB2A030E01E3DB2AECD7DF2A3D
:10010000010E01E3DB2AD7D7040EE15C02E2E16ACB
:10011000E552E16EE552E7CFD9FF1200F00E936E83
:100120008A808A82C0DF8A908A92BDDFF9D7120066
:10013000000EF36E00EE00F0080E01D81200EA6027
:1001400002D0EE6AFCD7F350E9601200EE6AFCD7E9
:1001500013EE00F023EE00F0F86A019C04EC00F0CE
:0C016000B6EC00F08EEC00F0FBD71200B3
:02016C0012007F
:020000040030CA
:0100000024DB
Now here is the .Hex file compiled with Mplab X ide with same source code for blinking two LED.
HEX file compiled With Mplab X IDE -XC8 Compiler
:04000000AFEF3FF02F
:107F5E000001B2EF3FF0F00E936E00D08A808A825D
:107F6E008A848A86C5EC3FF08A908A928A948A9691
:107F7E00C5EC3FF0F3D7F2D700EF00F0000E026E23
:107F8E00000E016E0250800A6D0F880ED8B4015C8F
:107F9E00D8A001D001D002D02BD02AD0000E046E72
:107FAE00000E036E0450800A800F020ED8B4035CDC
:107FBE00D8A001D001D002D00ED00DD0034A042A91
:107FCE000450800A800F020ED8B4035CD8A001D0F2
:107FDE0001D0F4D700D0014A022A0250800A6D0F58
:107FEE00880ED8B4015CD8A001D001D0D7D700D06C
:027FFE0012006F
:020000040020DA
:08000000FFFFFFFFFFFFFFFF00
:020000040030CA
:0E0000002408191EFF8385FF0FC00FE00F407C
:00000001FF
I hope you noticed the difference between the both .hex files. Hence Mplab X can really save a lot of space when you are dealing with really lengthy and complex codes where programmers have to take the size of the program into serious consideration.
Thanks for reading
Rakesh Mondal
